
A common requirement, for even a simple business app, is the ability to generate a document, but there is no built-in Bubble PDF generator.
In our first Bubble article we created a simple app that showed how to generate a PDF document from Bubble. This second article shows how to:
- Use repeating data (repeating groups in Bubble).
- Use MultiLine input types and the "find and replace" Bubble function
Overview
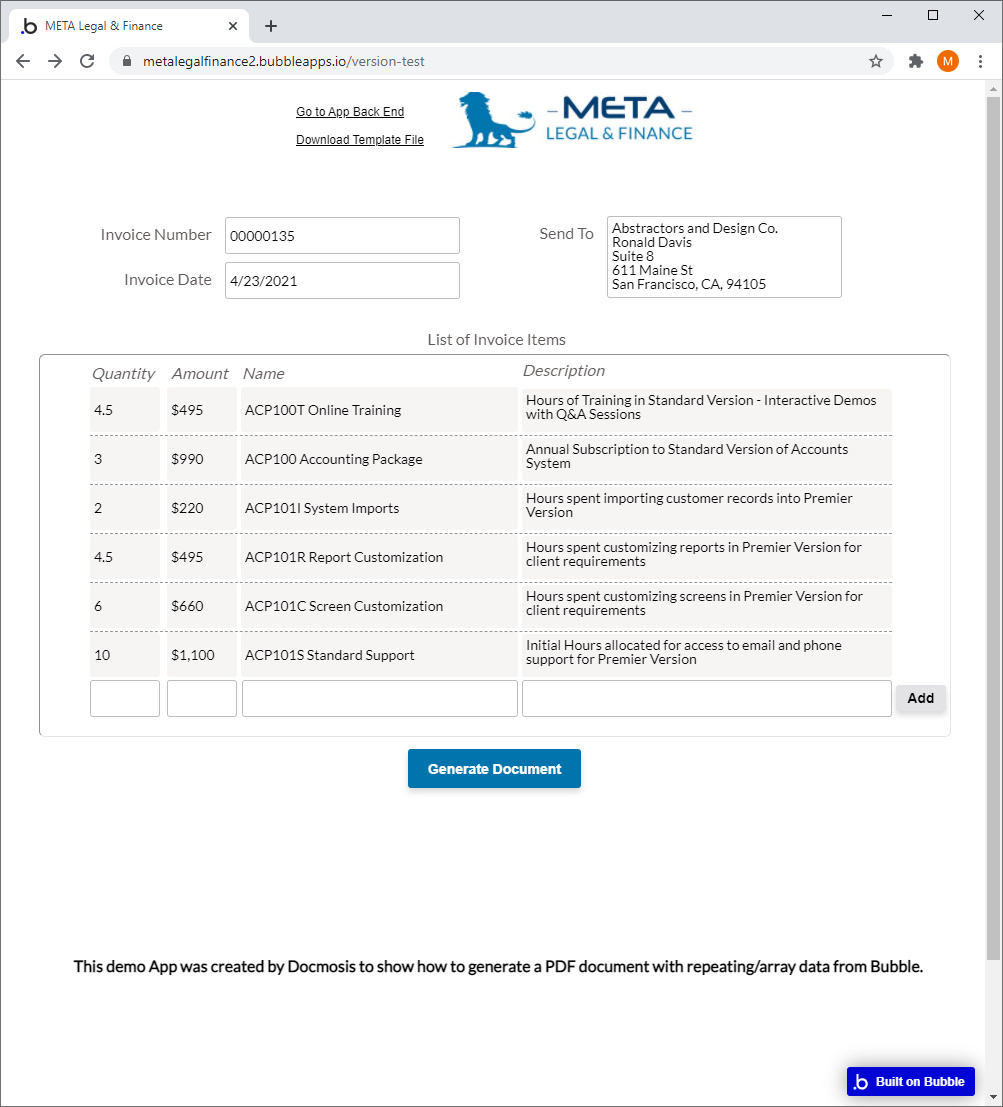
In this example we create a webform with a repeating group to collect multiple lines of data. We will use the Docmosis Cloud service to generate a PDF Invoice containing the data. The invoice will be based on a Microsoft Word template stored in your Docmosis Cloud account.
When the form is submitted the data from the form and the repeating group will be sent to Docmosis and merged with the template to create the PDF.
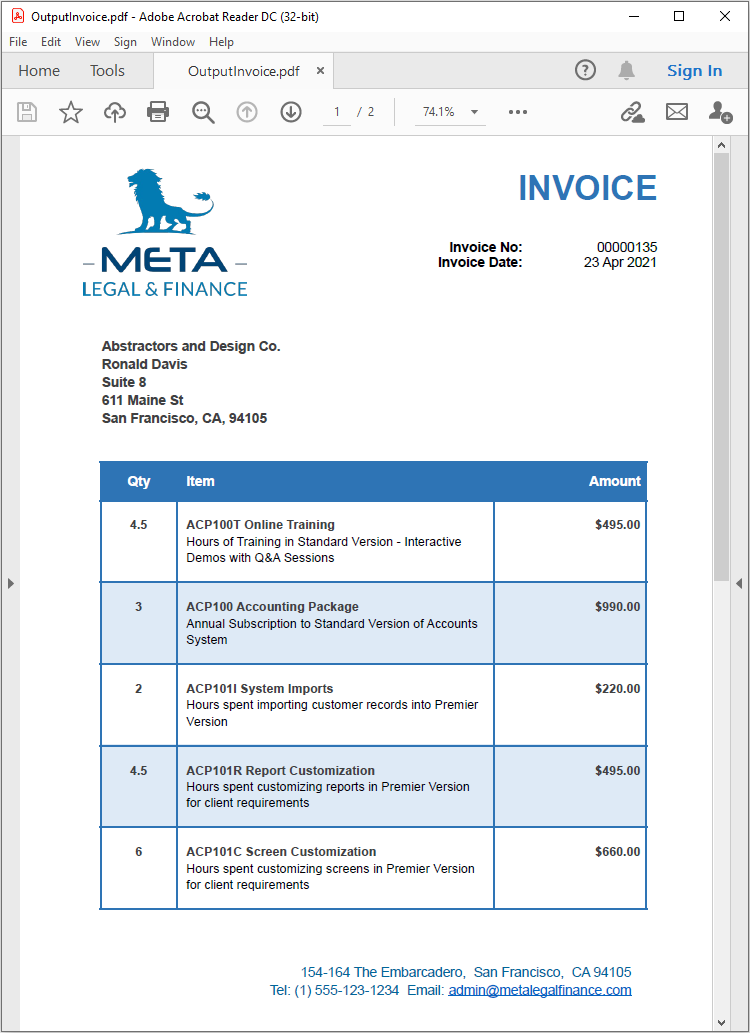
The generated PDF invoice will be returned to the Bubble application and displayed in a hyperlink.
You can try out our demo Bubble app and download the generated PDF, here:
If you are already familiar with Bubble you can view a read-only version of the back-end of our application.
You will need
Bubble Account
Obviously, there is a lot to learn about Bubble. Follow their signup process and interactive lessons to get you started.
Create a new Bubble app or start work with an existing one.
Start with the Workflow to see the Steps, and in the Plugins > Api Connector > Docmosis you can see the GenerateInvoice call details.
Docmosis Cloud Account
If you don't already have a Docmosis Cloud account, you can sign up for a free trial here.
Once you have an account you should login to the Docmosis Cloud Console.
Note: In this example we are using the US region for storing templates and generating the document, but you could choose EU or AU as needed.
Let's Get Started
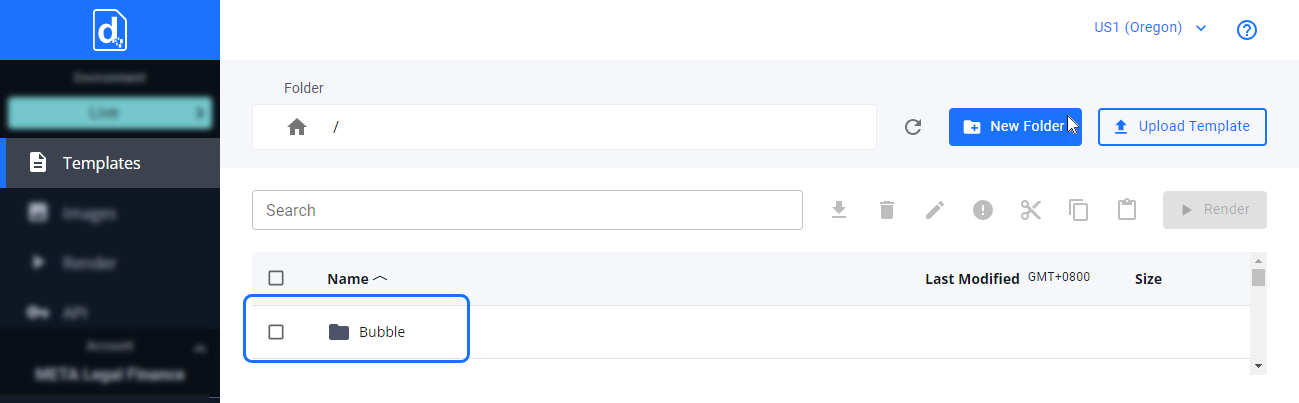
Step 1: Upload the Template to your Docmosis Cloud Account
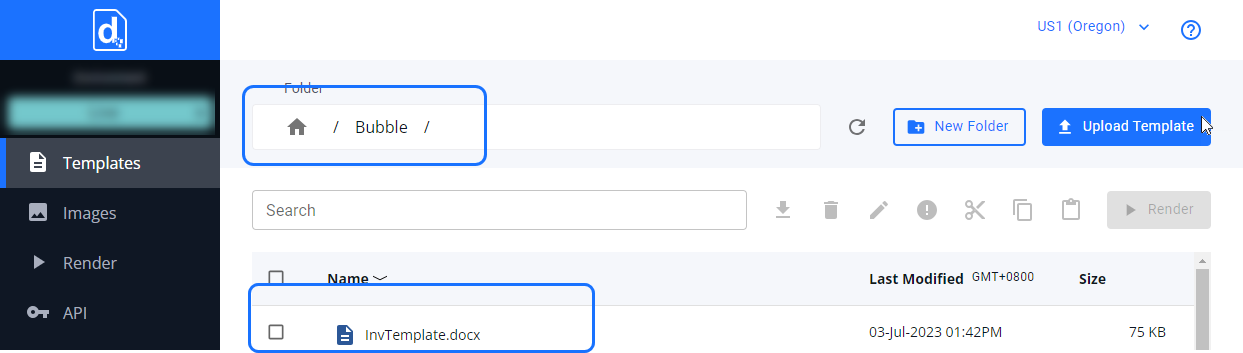
1.A) In this example, in your Docmosis Cloud account, create a top-level folder called "Bubble".
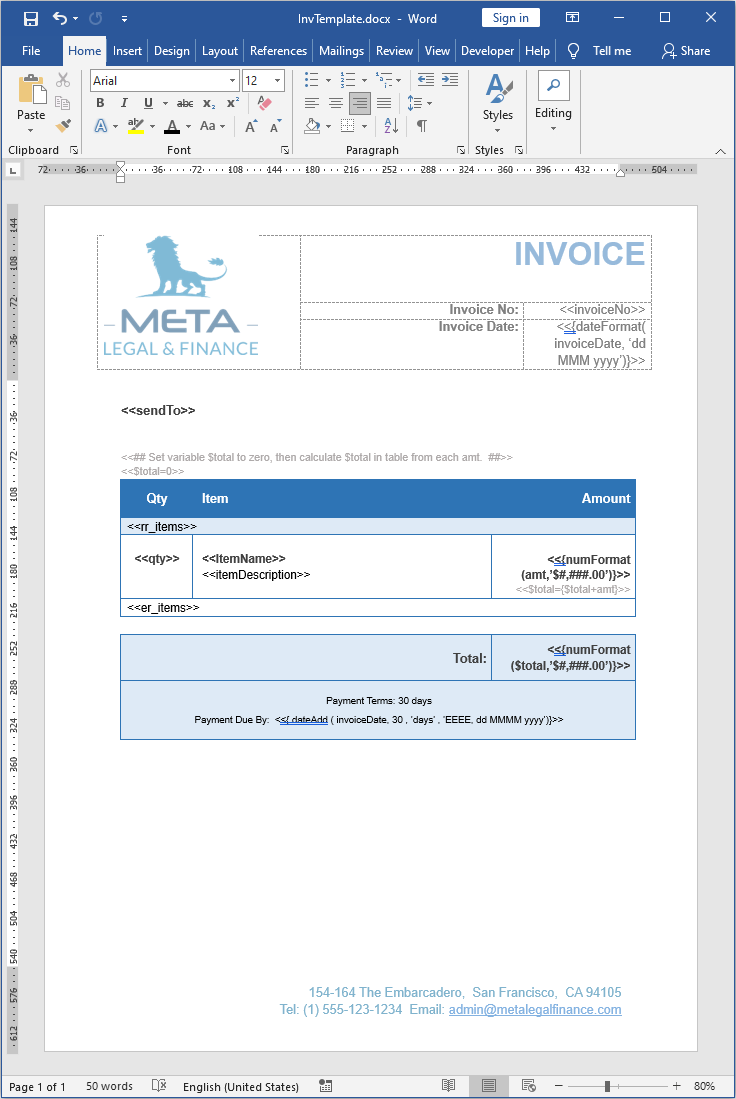
1.B) Next, download the sample Microsoft Word template using the link below.
Note: If you open the template in Microsoft Word you will see the Repeating Rows in the table will look like this: <<rr_items>> and the data will come from a repeating group in Bubble.
1.C) Upload the template to the Bubble folder in your Docmosis Cloud account. Your account should then look like this:
Step 2: Locate your Docmosis Cloud access key and URL
Navigate to the Account page in your Docmosis Cloud account. You will need the access key and URL when setting up the call to Docmosis in your Bubble application.
Step 3: Configure your Bubble app to send data to the Docmosis Cloud API
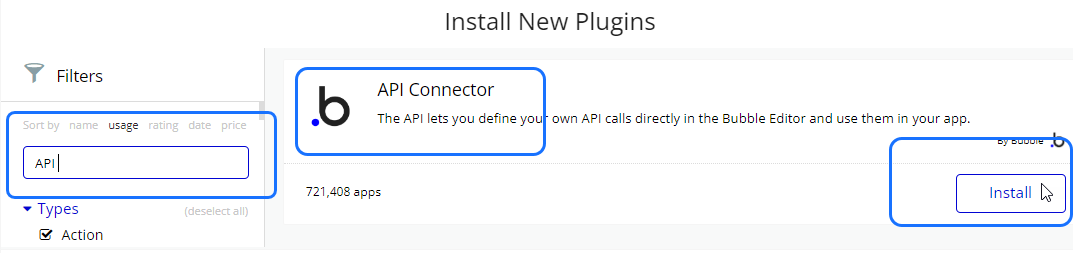
This sample Bubble app makes use of the free Bubble API Connector plugin to send data to the Docmosis Cloud service.
3.A) Install the "API Connector" plugin by clicking on the "Plugins" tab in the left menu and searching for “api”.
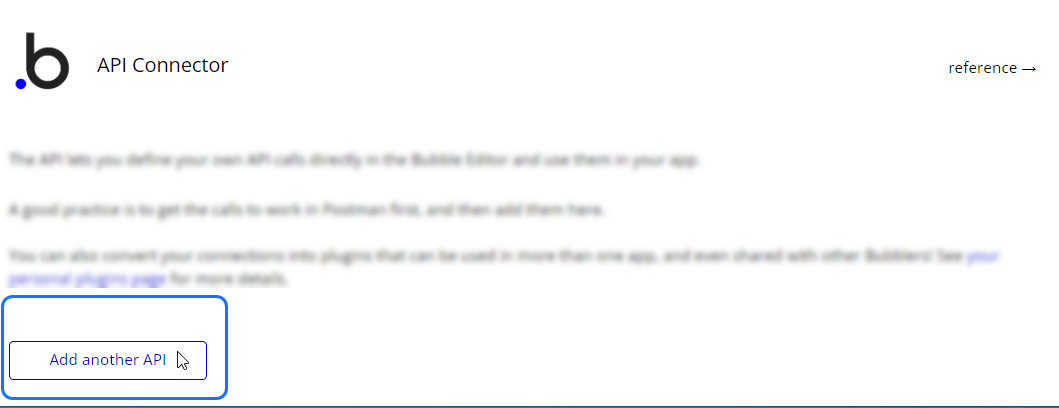
3.B) Click "Add another API" to start configuring the call to the Docmosis Cloud service.
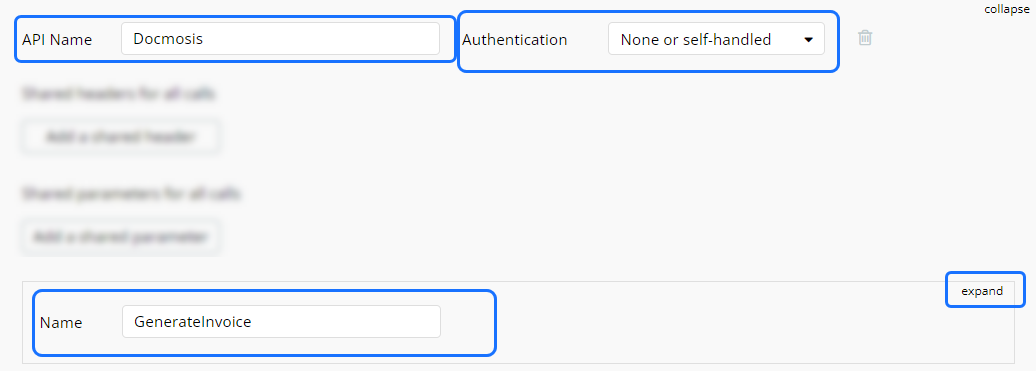
3.C) Choose an "API Name", we used "Docmosis", and a "Name" for the API call, we used "GenerateInvoice". Leave Authentication set to "None or self-handled".
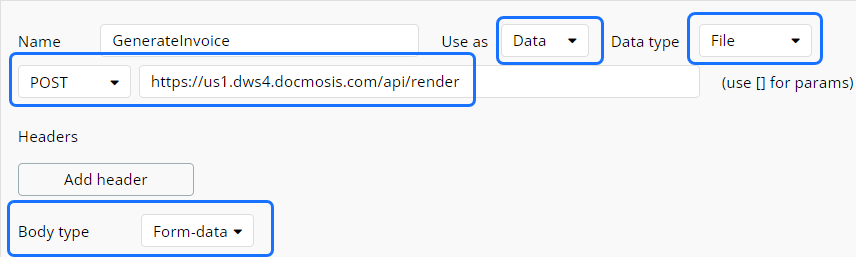
3.D)Click "expand" then:
- Set "Data type" to "File";
- Set "Use as" to "Data";
- Set "Method" to "POST";
- Set "URL" to the URL from Step 2 above;
- Append "render" to the URL;
- Set "Body type" to "Form-data".
Note: The image below is using the "US" endpoint. You can find complete information about the Docmosis processing locations and endpoints like "/render" in the Web Services Guide available in Documentation.
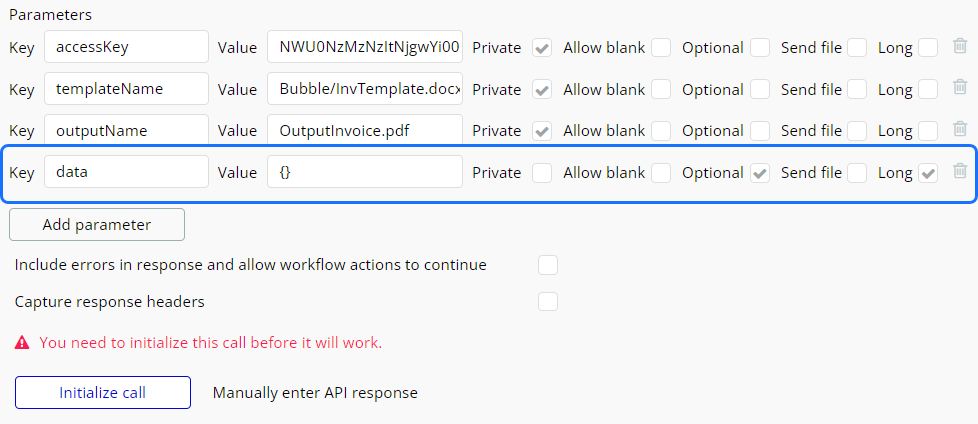
3.E) Use the "Add parameter" button to add four new parameters.
Note: the parameters are case sensitive. So "accessKey" needs a capital "K".
The first three parameters are the same as our first bubble article.
The fourth parameter is "data". This field is used to send all of the data in JSON format which will accomodate repeating groups of data. Note that we set this field to "Long" as JSON text can get very long.
3.F) Click initialize call, if everything is entered correctly you should get the following:
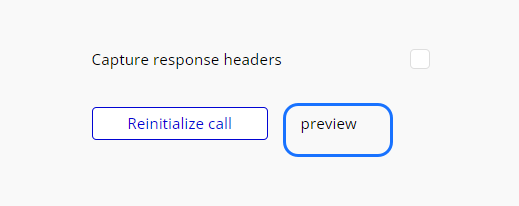
Note: By initializing the call you are actually generating a sample document. The "preview" link will download the document, but it will be called "api_initialize_file". If you rename the file to "something.pdf" (ie. with a ".pdf" extension) and open it - you will be able to view the file.
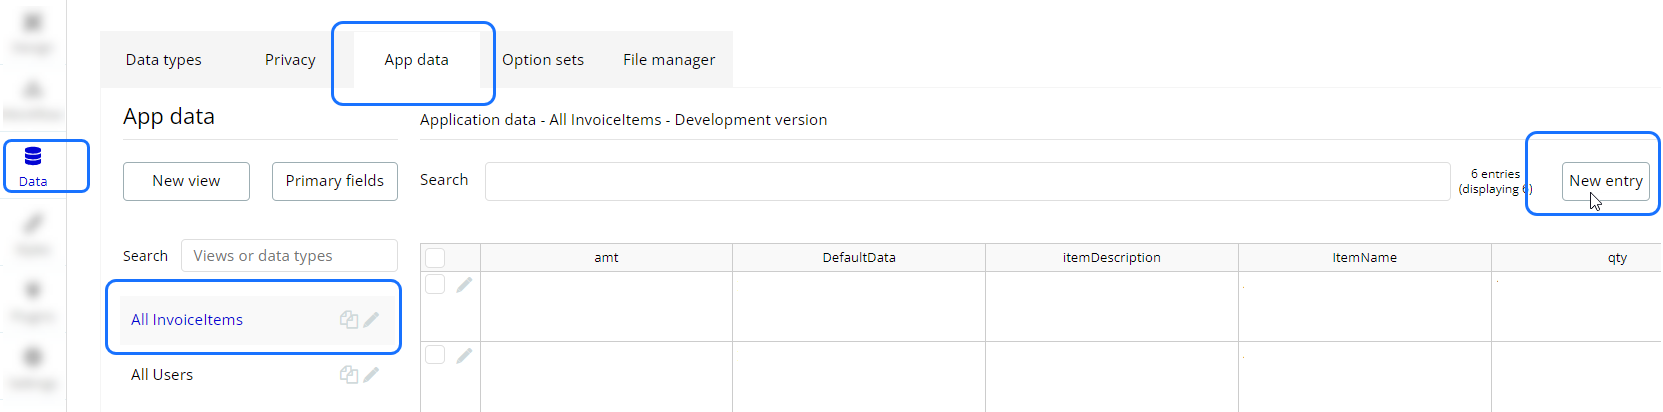
Step 4: Create new Data Types to store the Invoice Items and to store the generated File .
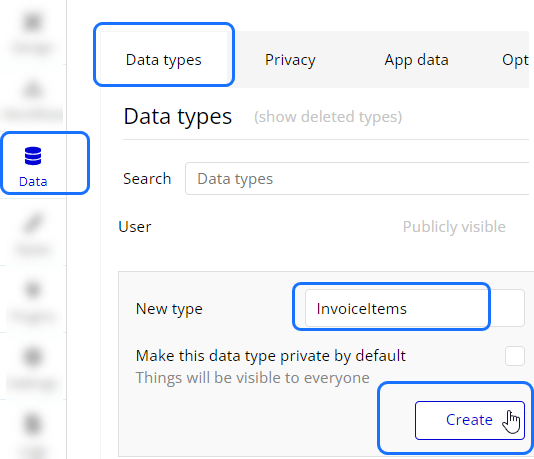
4.A) Click on the "Data" tab in the left menu. Under the "Data types" tab, type a name for the "New type" and click Create:
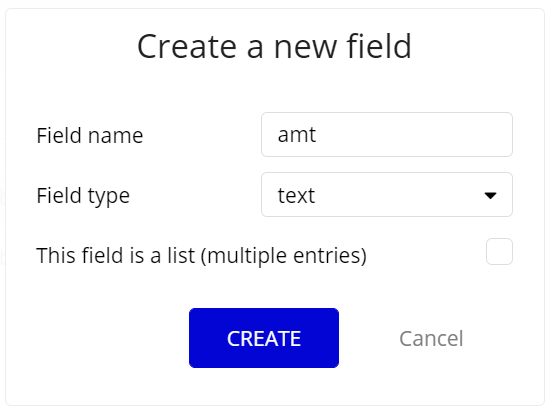
4.B) Now click on the "Create a new field" button:

4.C) And add a new field for each value in the repeating data.
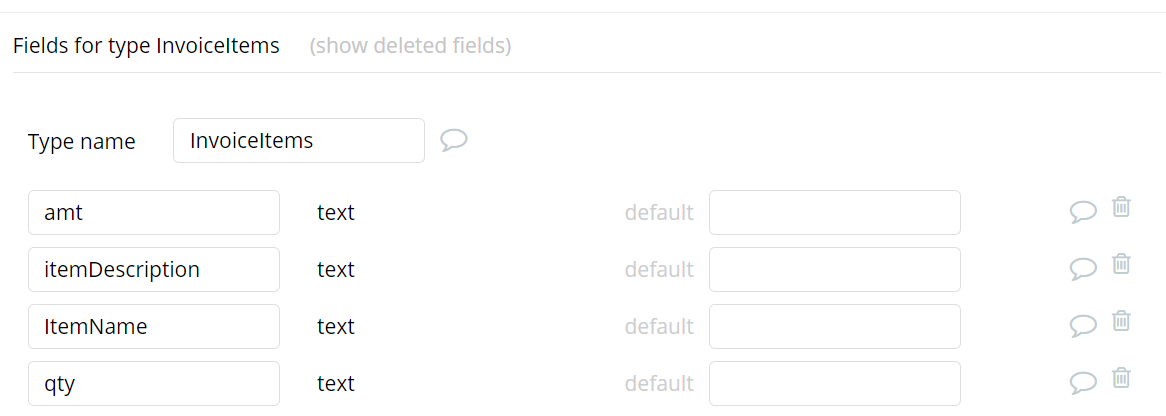
4.D) Once this is done it should look something like this:
Note: Our example bubble app has an extra field called "DefaultData", this field is not required and is just used to reset our demo app.
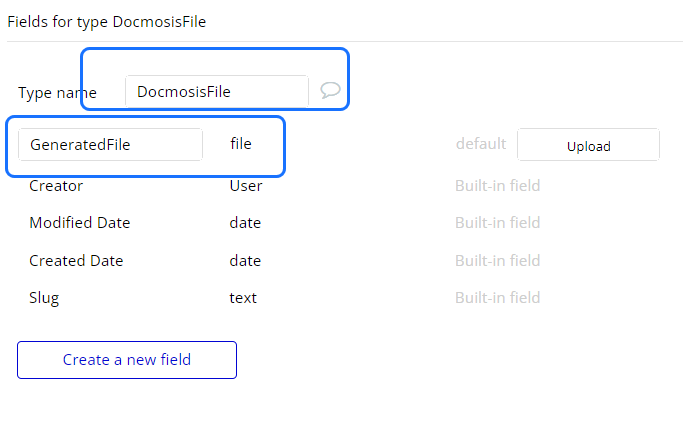
4.E) Follow step 4.A till 4. C to create a DocmosisFile Data Type, with a "GeneratedFile" Field. Once this is done it should look something like this:
Note: Our example bubble app has an extra field called "GeneratedFile - deleted", this field is not required and is just used to reset our demo app.
4.F) Optionally, you can now add some starting data for your repeating group or leave it empty.
Step 5: Create a web form to collect the data
5.A) Using the Design tab, add the "Input" and "MultiLine Input" fields to collect the data. An input field is needed for each field <<…>> within the Docmosis template.
Note: Please refer to the Bubble "help" documentation for comprehensive instructions on building a web application.

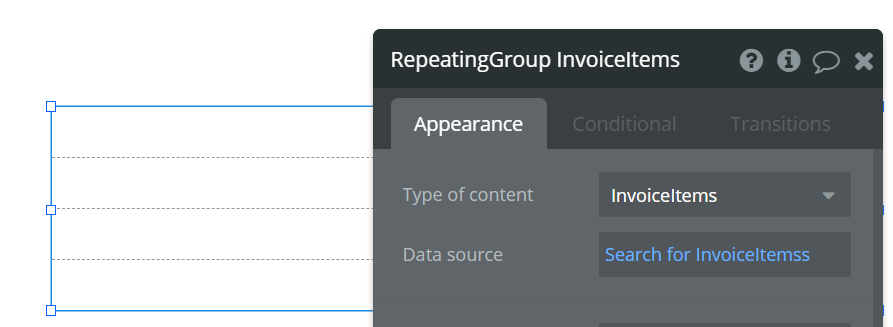
5.B) Using the Design tab, we next add a repeating group to store the list of Invoice Items. We will use the Data Type from Step 4 as the "Type of Content" for this group and set the "Data source" to all the items currently stored in the database (In case we added any starting data in Step 4).
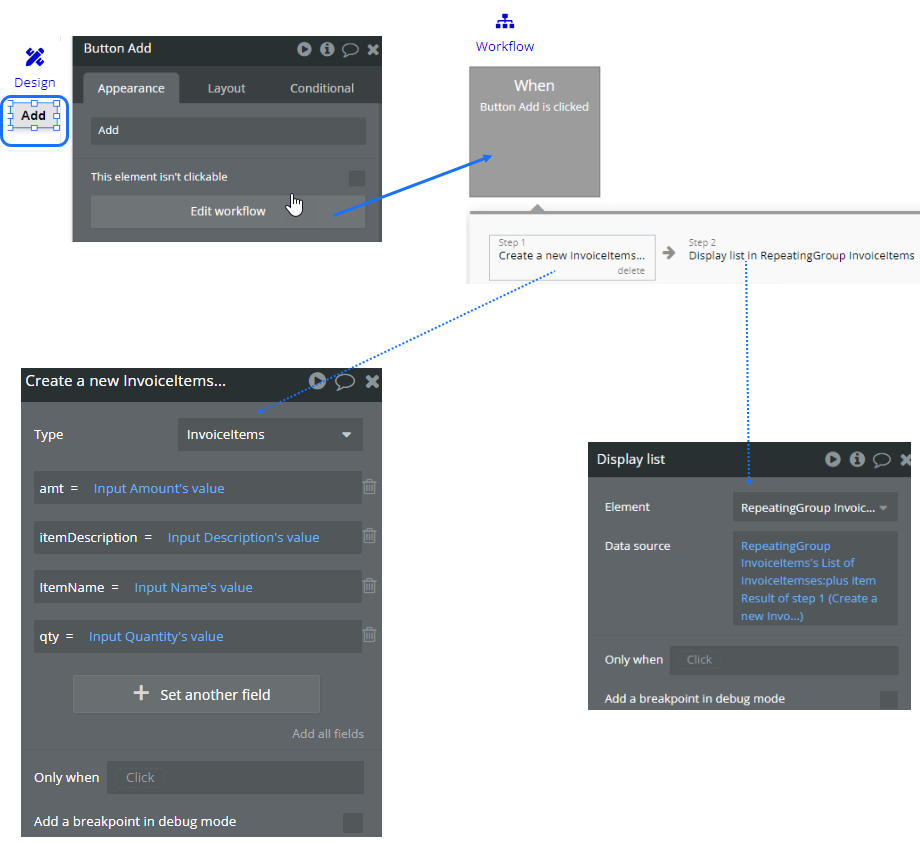
5.C) This group will need 4 input fields for displaying the values within the group. We also add 4 input fields outside of the group for adding new items, and a button for adding new entries to the group.

5.D) In our demo app the "Add" button triggers a workflow which creates a new "InvoiceItems" thing and then adds this new thing to the repeating group.
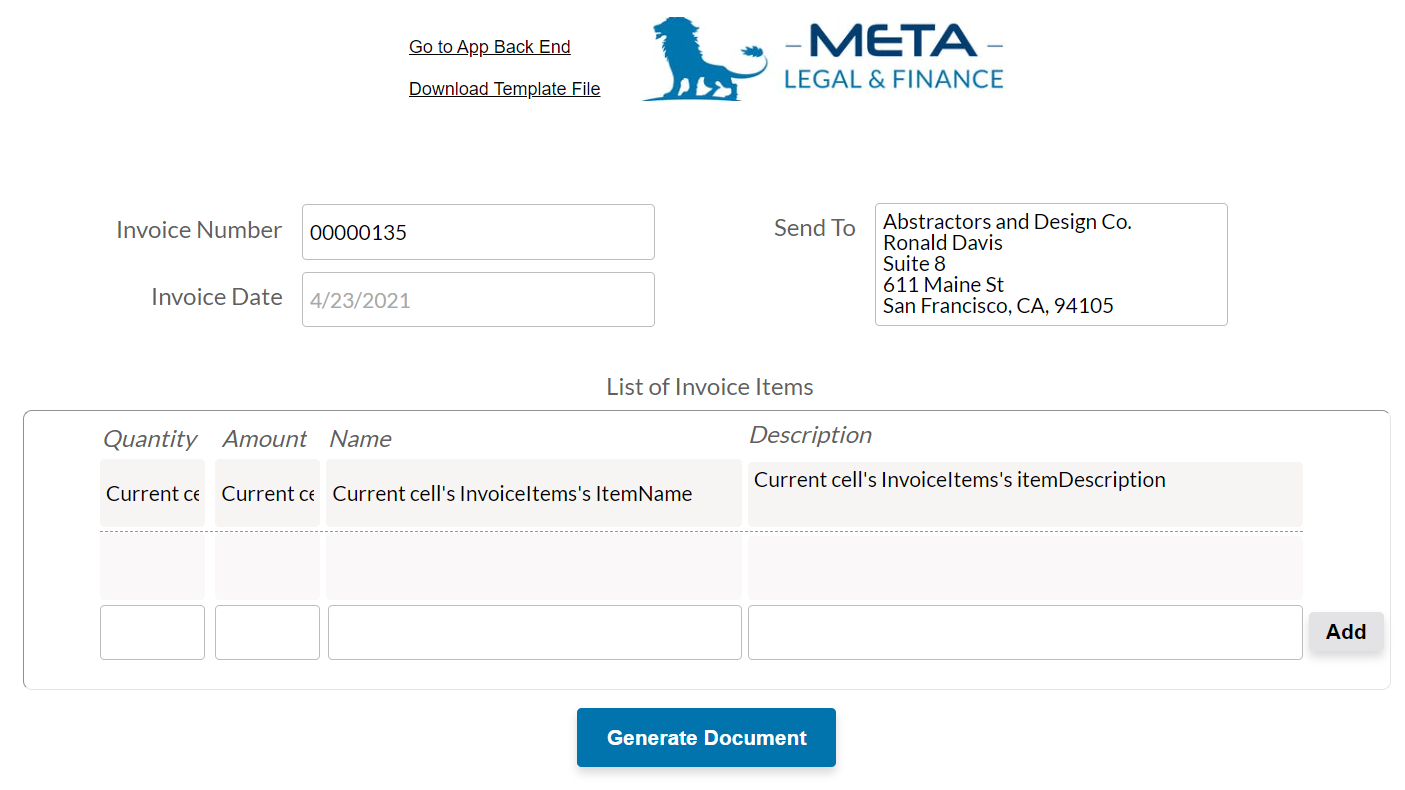
5.E) Once finished the form looks like this.
Note: the button added at the end of the form will be used to trigger the document generation workflow.
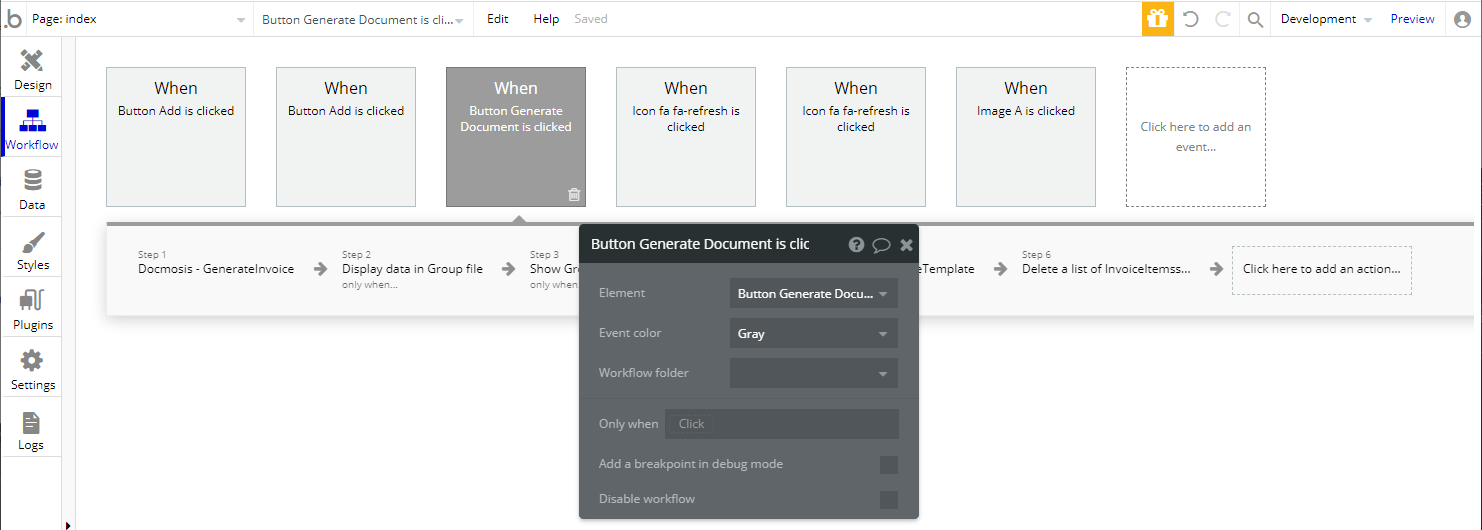
Step 6: Create a workflow to call the Docmosis API
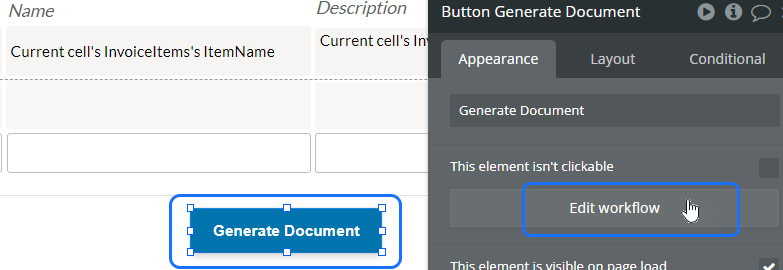
6.A) Select the button you wish to use to trigger the document generation and click Edit Workflow.
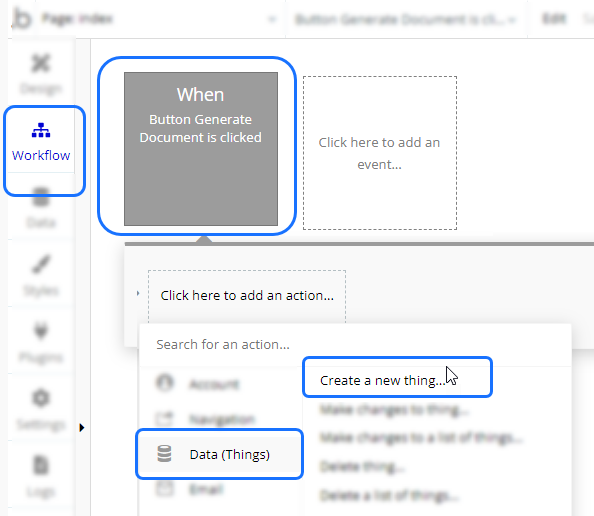
6.B) Step 1 of the workflow is to Call the Docmosis API that we set up in Step 3 of this article. Click on "Click here to add an action..."and select the "Data (Things) tab" and then click "Create a new thing....
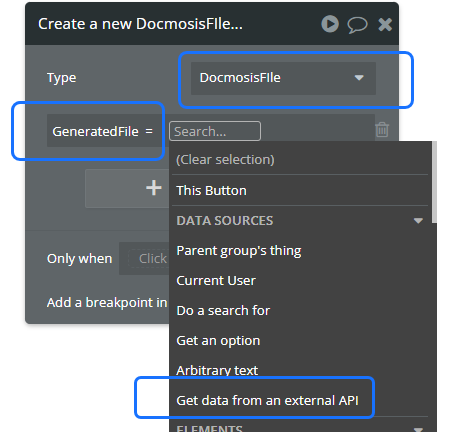
6.C) For the "Type" select the data type you created in step 4.E (DocmosisFile). Click "Set another field" and select the file field of your thing (GeneratedFile) and set this to "Get data from an external API".
Note: It is this step that is ensuring the file generated by Docmosis will be stored by Bubble.
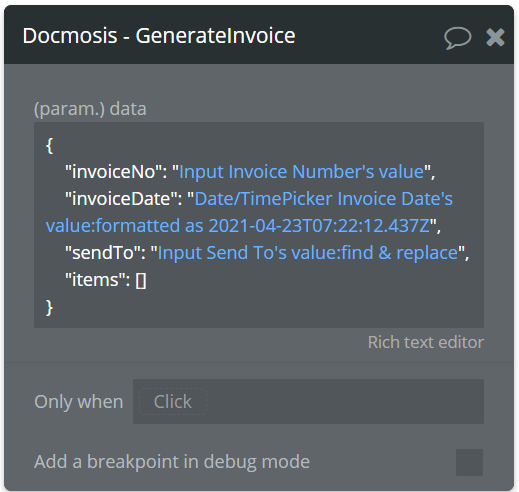
6.D) The next (and most important) step is creating the JSON to send to Docmosis.
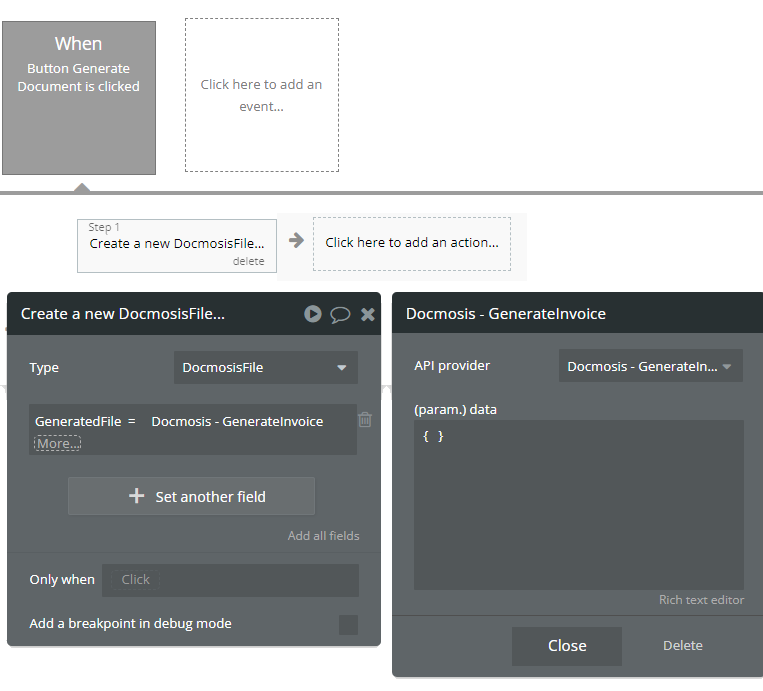
In this example the JSON should look like something like this when received by Docmosis:
{"invoiceNo": "00000135","invoiceDate": "23 March 2021","sendTo": "Abstractors and Design Co.\nRonald Davis\nSuite 8\n611 Maine St\nSan Francisco\nCA\n94105","items": [{"qty": "10","ItemName": "ACP101S Standard Support","itemDescription": "Initial Hours allocated for access to email and phone support for Premier Version","amt": "1100.00"},{"qty": "6","ItemName": "ACP101C Screen Customization","itemDescription": "Hours spent customizing screens in Premier Version for client requirements","amt": "660.00"},{"qty": "4.5","ItemName": "ACP101R Report Customization","itemDescription": "Hours spent customizing reports in Premier Version for client requirements","amt": "495.00"},{"qty": "2","ItemName": "ACP101I System Imports","itemDescription": "Hours spent importing customer records into Premier Version","amt": "220.00"},{"qty": "3","ItemName": "ACP100 Accounting Package","itemDescription": "Annual Subscription to Standard Version of Accounts System","amt": "900.00"},{"qty": "4.5","ItemName": "ACP100T Online Training","itemDescription": "Hours of Training in Standard Version - Interactive Demos with Q&A Sessions","amt": "495.00"}]}
We will start with the First level of the data which will look like this:
{"invoiceNo": "","invoiceDate": "","sendTo": "","items": []}
This is the JSON structure for the root of the JSON data payload, we can add this to the "data" field of our Workflow Action and insert the invoice number, invoice date, and send to Input field's values.
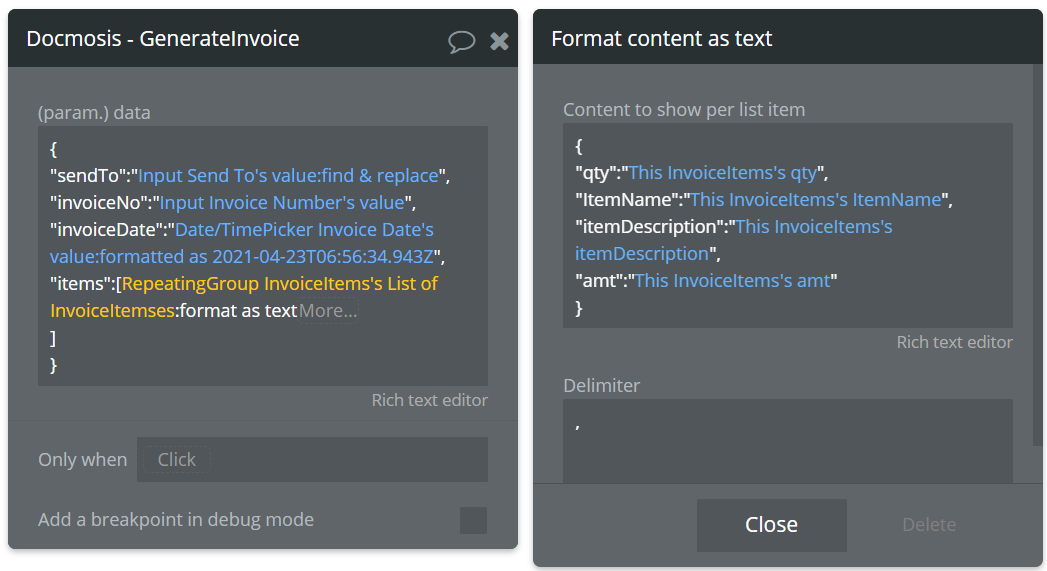
Next we need to build the JSON for the repeating section of our data. Under "items" we add RepeatingGroup InvoiceItem's List of InvoiceItemses and then we add the function "formatted as text". This function allows us to define the JSON structure to use for each item of the repeating group. So the basic structure of each item in our group will look something like this:
{"qty": "","ItemName": "","itemDescription": "","amt": ""}
We can add this to the Content to show per list item section of the function and insert the quantity, item name, item description and amount values dynamically. We also add a "," as a delimitator, this will separate each group in the result. The final configuration of this action should look something like this:
Note: If you are not sure what the structure of your data should look like for your template, then the Docmosis Console has the ability to generate sample JSON data.

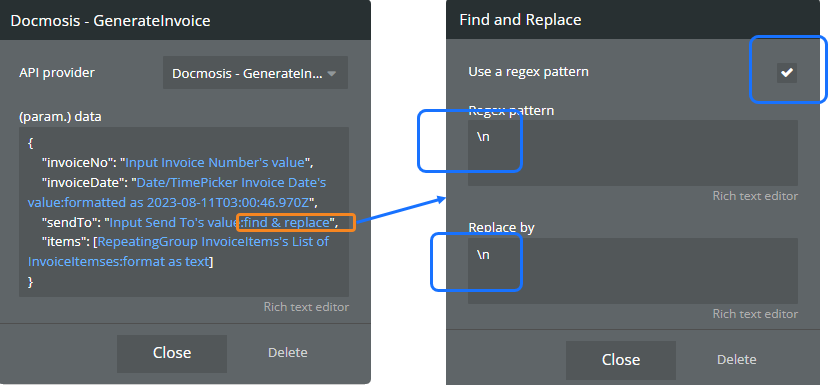
Note: For "MultiLine" input types you will need to use the "find and replace" bubble function to convert line endings into the text "\n". This is used in JSON to denote a newline. Tick "Use a regex pattern" and add "\n" to both of the input boxes.
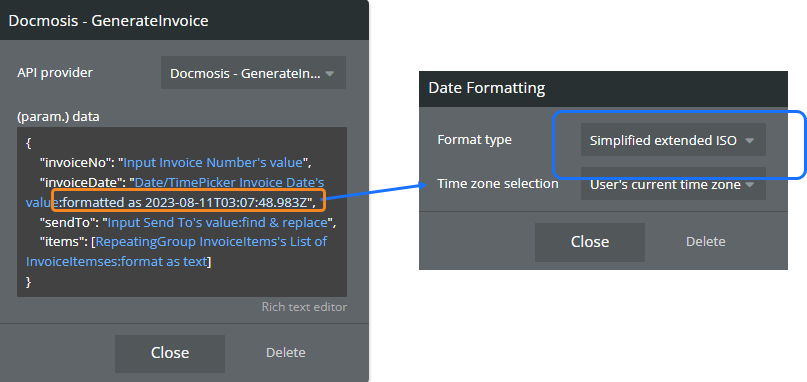
Note: For date/time input you can choose how you want the Date to be formatted for sending to Docmosis. In this example we use "Simplified Extended ISO" because the final formatting of this field is done in the template.
Note: In our example app we have an additional step that deletes our invoice items that are more than 5 minutes old. This is optional and is used to keep our example app from filling up with data.
That’s it - you're Finished!
Now if you "preview" your app, and select the "Generate Document" button - you should receive a completed PDF.
If you followed our guide and need help please contact support.
Key Resources
- Try the front-end of our Bubble app
- Explore the back-end (read only) of our Bubble app
- Start a Docmosis Cloud free trial here.
- Download the sample invoice template used in this example.
