Creating high-quality templates is essential for generating well-structured documents.
This tutorial explores the use of tables, paragraph properties and other template editor features to ensure that, as content is added or moved, the template always works in a predictable manner.
Template creation
BEST PRACTICE: Use desktop software to create templates and not file conversion tools.
Manual creation results in the best quality templates
Build templates from scratch using a recent version of desktop software: Microsoft Word or LibreOffice Writer.
If starting from an existing DOCX or ODT file, run a test render with Docmosis and check that quality of the that file results in the desired layout and formatting.
Don’t use older format Word DOC files. Instead open it in Word and use Save As to convert it to the newer DOCX format.
File conversion results in poor-quality templates
Converting files using online tools, eg: convert a PDF to a DOCX, almost always leads to poor quality files that are unsuitable for automated document generation.
These tools often use OCR-style techniques that break up the content into floating text boxes. During document generation, when data is injected and content is added or removed, these floating elements often result in layout issues, unpredictable formatting, and broken structure.
Template editing
BEST PRACTICE: Use the template editor features to visualize the template structure.
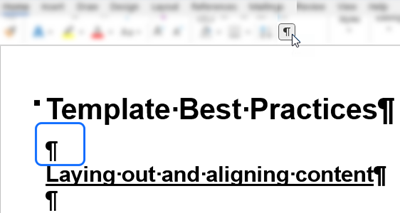
Enable hidden characters
Enabling the display of "hidden" characters is highly recommended when working on templates.
This feature reveals special symbols for content you can't usually see, such as: spaces; tabs; paragraph markers; page/section breaks; and other structural elements, making it possible to understand how the template is structured.
To show or hide these hidden characters, click on the ¶ in the top ribbon:

View table gridlines
Using the Table Layout > View Gridlines feature displays the table structure as fine dashed lines in the template.
For the table example below, the borders are set to "No Border" however the cell boundaries are still visible in the template.

These dashed lines will not appear in the generated document, they just assist with visualizing the table structure in the editor.
Aligning content
BEST PRACTICE: Use tables to control the alignment of related pieces of information.
Avoid using white-space to align content
Using multiple consecutive white-space characters, such as lots of spaces or tabs, to align content, can lead to alignment issues when dynamic data is inserted in to the generated document.
In the example template, the <<label>> and <<data>> fields are separated by three tab characters. If the "labels" are different sizes this can lead to misaligned output in the generated document.

Use tables to layout content
When using tables to layout content, set table borders to "No Border" so the table borders don’t appear in the generated document.

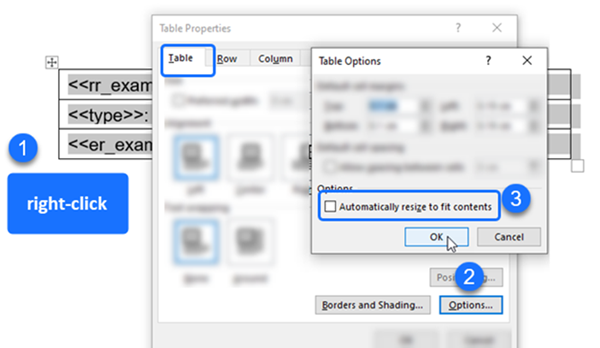
Turn off the table property: “Automatically resize to fit contents” to ensure the table retains it’s size/shape in the generated document.

The Example Template - Disclosure Form, shows the setting "Automatically resize to fit contents" in a practical example.
Creating a "flat" template
BEST PRACTICE: Wherever possible set text wrapping to "In Line with Text".
Avoid using "floating" items
Some items, like text boxes or images, can be positioned such that they "float" on the page and the surrounding text "wraps" around the item.
Using a text wrapping setting other than "In Line with Text", may cause content to layout in an unpredictable or undesirable way following the document generation process.
In the example template, a text box is positioned so that it "floats" on the right hand side of the page, by using a text wrapping setting of "Square".

When the document is generated, and the optional paragraph is removed, the sentence further down the page, moves up to a position where the “Square” text wrapping takes effect.

This same problem can occur with images that use a text wrapping setting other than "In Line with Text".
Use tables to layout content
Laying our content using tables make it possible to create "flat" templates, where it is much easier to control the final position of content.
Any text in the template, and also items on the page that use "In Line with Text", will moved in a more predictable way, as other content is added or removed during document generation.
In the example template, the same layout as the text box above can be acheived using a full width table. The borders of the table are turned off, apart from the cell on the right, to create the same visual appearance as the text box.

During document generation, if the <<op:>> field is removed, the sentence below the table will naturally move up/down the page with no unexpected changes.

The Example Template - Generating Account Statement, uses tables to position a combination of placeholders and static content, in the header and footer of the document.
Using paragraph settings
BEST PRACTICE: Use paragraph pagination settings to ensure content lays out in a predictable way.
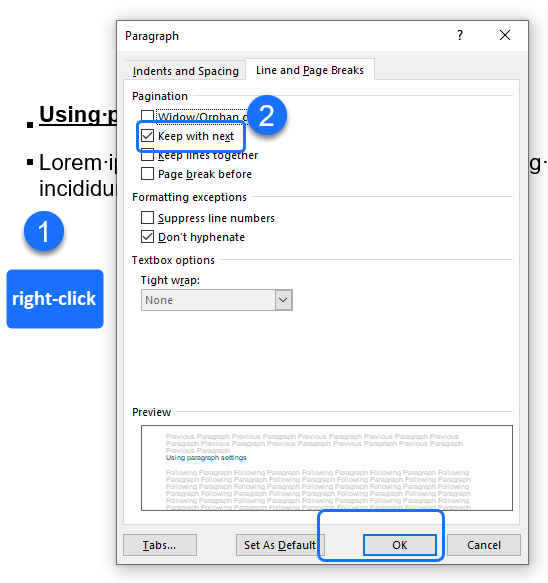
Keep with next
In the example template, the heading "Using paragraph settings" appears at the top of the second page, even though there is room on the bottom of the first page to fit the heading.
This is because the heading is "glued" to the following sentence using the paragraph setting “Keep with next”.

This feature enables related content to be grouped together. For example: Headings should generally appear immediately before their associated paragraphs, preventing them from being split across pages.
When this example document is generated, content further up the document is removed, creating sufficient room at the bottom of the first page, such that the heading and the sentence can fit on that page.
The Example Template - Employment Agreement uses "Keep with next" to keep the lines of a signature block together.


