The template shows how to achieve color-coded risk ratings by conditionally coloring table cells.
Example in detail
This example exists primarily to show the bgcolor attribute.
Tables are used to lay out the information, with a placeholder image inserted into one of the table cells.
A dynamic table with repeating rows is used in the body of the report to show the property's color-coded risk ratings.
Adding a dynamic image
This template uses a placeholder image in the top right corner.
The placeholder image in the template is replaced by a photo of the property when the document is generated. Refer to the article Images to understand placeholder images.
Images can be provided in one of two ways:
- entirely by the data
- stored, and then selected by supplying just the name of the image in the data.
This example uses the second approach, which is called a "stock" image. The "property.png" file has been previously stored and only the name of the image is sent in the data.
![]()
For more detail on sending or storing image files, refer to the article How to send image data or retrieve images from a file or URL.
Adding a dynamic table
To see the structure of the "risk ratings" table, select the table, then choose View Gridlines in the Layout ribbon tab.

The <<rr_ and <<er_ directive is used to loop through the propertyAspects array, displaying the risk information associated with each aspect of the property.
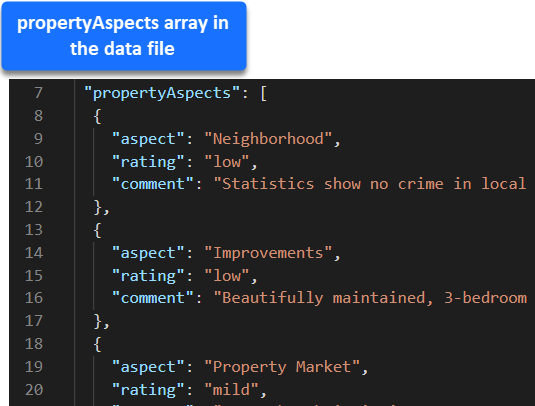
For further information on using the <<rr_ directive, see Tables.
Disabling alternating row coloring
By default, Docmosis will apply alternating table row colors whenever a row inside a set of repeating rows has a different background color to that of the starting row with the <<rr_ directive. See Alternating row colours.
To disable the alternating rows effect on the "risk ratings" table, the directive <<noTableRowAlternate>> is used.
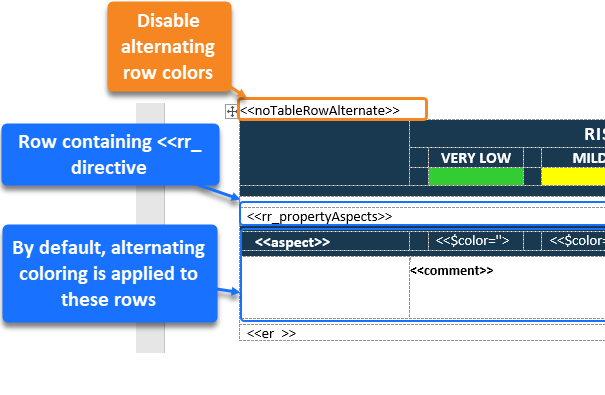
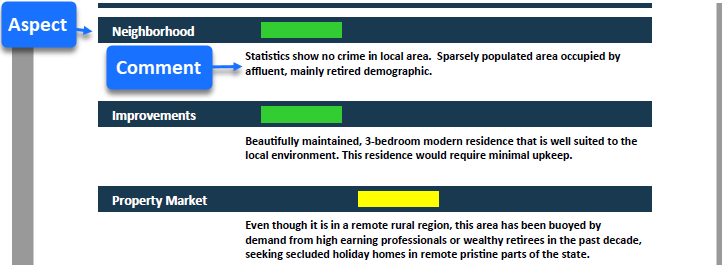
By disabling alternating rows, the navy background for the <<aspect>>, and a white background for the <<comment>> is maintained.
Assigning the bgcolor
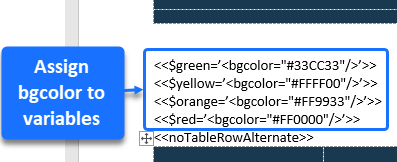
The html-like bgcolor attribute is used to define the background color of table cells.
- The bgcolor attribute defines colors using 6-digit hex codes.
- The bgcolor is assigned to a variable in code above the table.
- The bgcolor attribute can only be applied to individual table cells.
Here is the syntax for assigning the bgcolor variables, and then setting the table cell colors as determined by the data in each row of the propertyAspects array.
- Above the table, create a new variable called $green and assign a bgcolor with the hexadecimal value for green:
<<$green=’<bgcolor="#33CC33"/>’>> - Similarly, create the variables $yellow, $orange, and $red and assign a bgcolor to each of these, where the hexadecimal value for the bgcolor corresponds with the variable's name (yellow hexadecimal value for $yellow, and so on).
Within the table, repeating rows are used to loop through the propertyAspects array. Each row is evaluated for its rating, and each of the four cells will be assigned its specified background color if its condition is met. The actual code used to conditionally color the table cells is concealed in the highlighted cells below.

Note: The code contained in "Cell 1" looks like this, with variations of the same code in "Cell 2", "Cell 3", and "Cell 4":
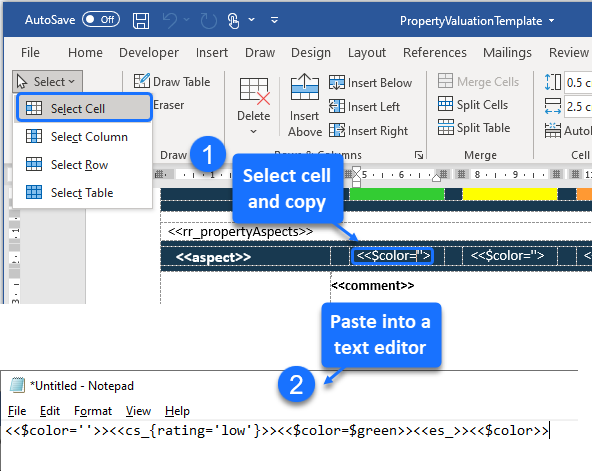
<<$color=''>><<cs_{rating='low'}>><<$color=$green>><<es_>><<$color>
- In the table, use repeating rows to loop through the propertyAspects array:
<<rr_propertyAspects >>...<<er_>>. - Within the repeating loop, carry out these steps for "Cell 1":
- Assign an initial value of null to the $color variable: <<$color=''>>
- If the rating for this row = low, update the $color variable to the value in the $green variable:
<<cs_{rating='low'}>><<$color=$green>><<es_>> - Display the $color variable in the cell: <<$color>>
If $color is still null (the condition is not met) then there is no background color. If $color is $green, then it is <bgcolor="#33CC33"/> and this results in a green background color for this cell.
- Still within the repeating loop, carry out similar steps for the contents of "Cell 2", "Cell 3", and "Cell 4".
- For "Cell 2" give the cell a background of yellow if the rating is mild:
<<$color=''>><<cs_{rating='mild'}>><<$color=$yellow>><<es_>><<$color>> - For "Cell 3" give the cell a background of orange if the rating is moderate:
<<$color=''>><<cs_{rating='moderate'}>><<$color=$orange>><<es_>><<$color>> - For "Cell 4" give the cell a background of red if the rating is high:
<<$color=''>><<cs_{rating='high'}>><<$color=$red>><<es_>><<$color>>
- For "Cell 2" give the cell a background of yellow if the rating is mild:
Viewing and editing the contents of a table cell
To view the code inside a cell, copy the cell contents and paste the text into a text editor, such as Notepad.
- To copy a cell's contents: select the cell, then choose Select > Select Cell in the table's Layout ribbon tab, and press Ctrl+C to copy.
Choosing colors and hex values in Microsoft Word
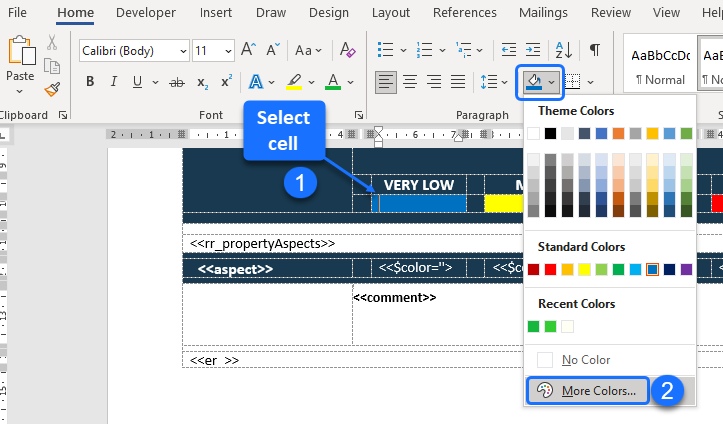
To change the background color of a table cell and find out the color's hex value, select the cell, click the Shading button on the Home ribbon tab, then select More Colors.
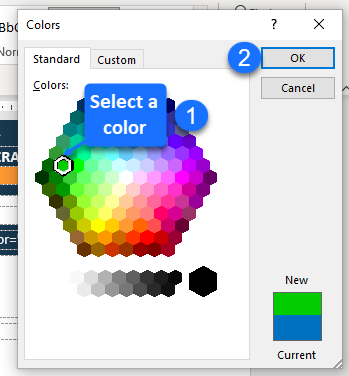
This opens the Colors window.
To select a standard color, click on a color hexagon in the Standard tab's color palette, then click OK to save it.
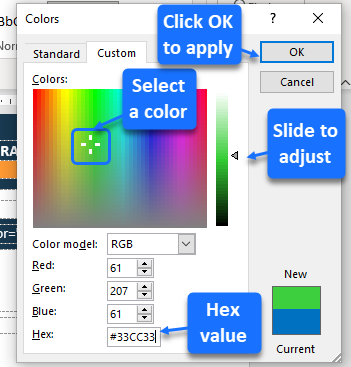
To choose a custom color, and to see the hex value, open the Custom tab.
The Hex value for the custom color can be copied and used for the bgcolor. The value changes when a different custom color is chosen.
- Click on a color in the palette to choose it.
- To adjust the selected color's tinting or shading, move the slider up or down.
To apply the custom color, click OK.
Note: Alternatively, type or paste a known hex value into the Hex edit box, then click OK to apply the custom color.
The new color is applied to the table cell.


