

A 2-page candidate profile.
This example shows useful techniques for displaying the types of repeating data commonly seen in curriculum vita and resumes.
Example in detail
This example shows the display of nested array data, use of tabs for alignment of information, different first page headers, and design elements such as Microsoft Word’s Styles feature.
Displaying repeating data
In this example, the data includes arrays for the candidate’s languages, skills set, work experience, education and achievements.
The template shows how a variety of options can be used for displaying array items. These are:
- on the same line, in a comma separated list
- on separate lines
- in bullet lists
The <<rs_ repeating section directive is used in each instance.
For an introduction on the <<rs_ repeating section directive, see Repeating Sections.
Displaying a comma separated list
The data contains an array of the languages spoken by the candidate.
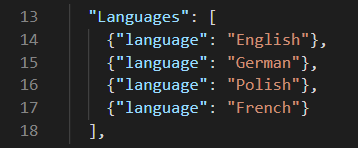
The template is designed to show these languages on the same line, separated by commas.


The code used between the <<rs_Languages>> and <<es_Languages>> loop caters for the possibilities of the candidate being proficient in one or more languages, with an “and” between the last two languages.
For a detailed explanation on displaying comma separated lists like this one, see This, This and That.
Displaying nested data
The nested Jobs array is used to display the candidate’s previous work experience.
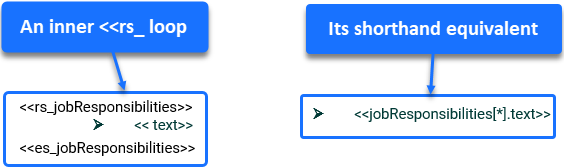
Each job element in the Jobs array contains an inner array of jobResponsibilities.
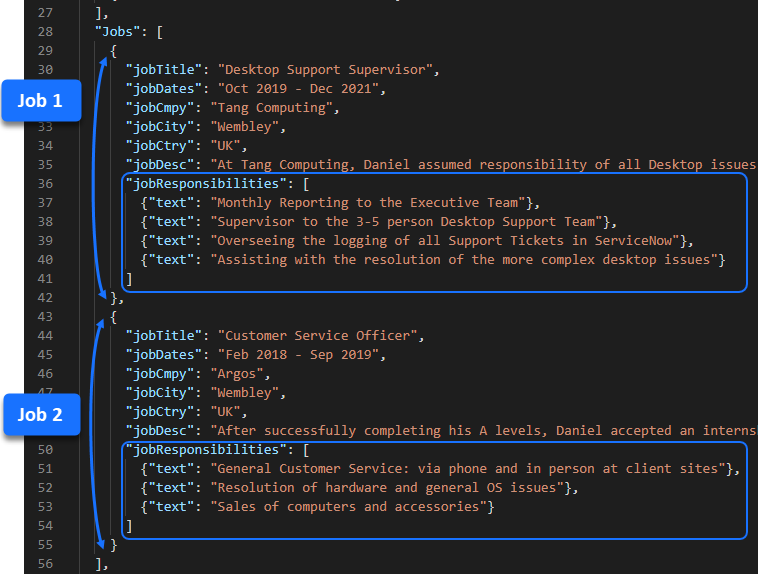
In the template, the <<rs_jobs>> repeating section loops through the Jobs array, displaying information on each job held by the candidate.
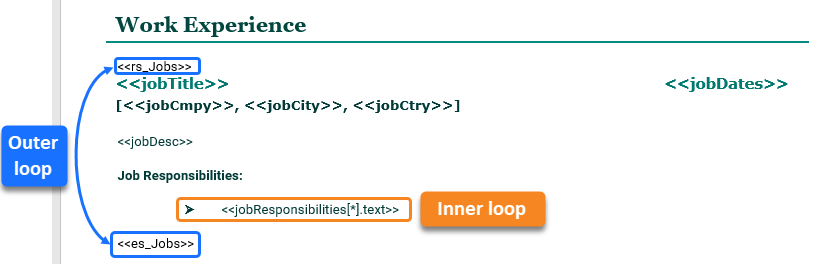
The <<jobResponsibilities[*].text>> expression serves as a shorthand equivalent of an inner <<rs_ loop. When combined with a bullet list, or numbered list, the [*] "all" specifier instructs Docmosis to loop and display the responsibilities text associated with each job.
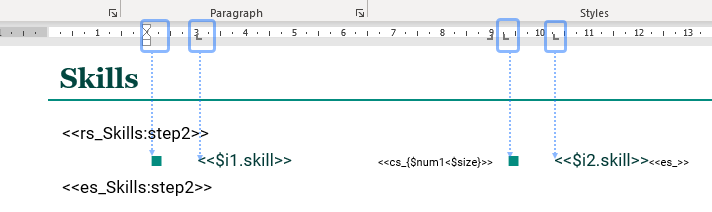
Displaying a two-column bullet list
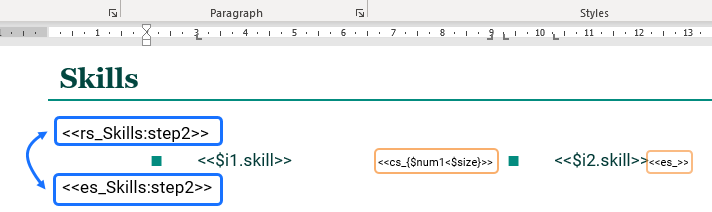
Docmosis can display a bullet list in multiple columns, using the stepping feature with the <<rs_ repeating section directive.
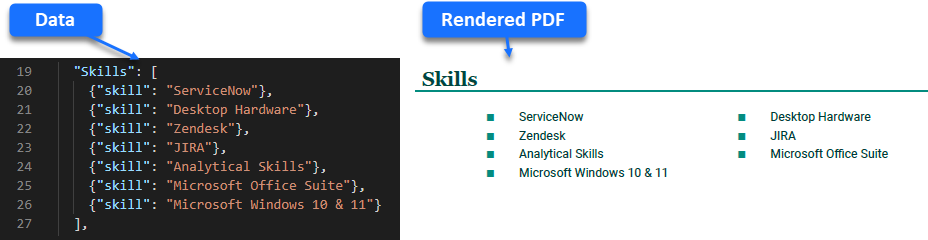
In this example, the Skills array is used to display a two-column bullet list showing the first and second skills on the first row, the third and fourth skills on the second row, and so on.
The steps to achieve this are:
- Use a repeating section directive to loop through the Skills array in "steps of 2": <<rs_Skills:step2>>...<<es_Skills:step2>>.
- Use the $i1 and $i2 built-in variables to show the first skill and the second skill on the first row, the third skill and the fourth skill on the next row, and so on: <<$i1.skill>> and <<$i2.skill>>.
- Use a conditional section to check if $num1 (the current index on into the array) is less than $size (the number of items in the array): <<cs_{$num1<$size}>>.
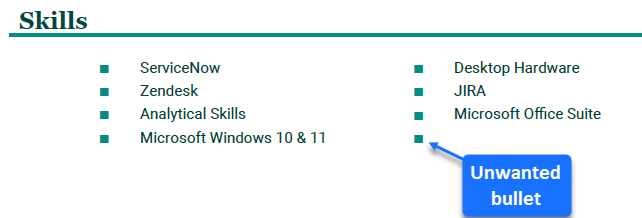
The conditional section around the second bullet prevents the following scenario in the output:
For more information on the Stepping feature, see Stepping - Data.
For more about the $size variable, see Array Size.
Inserting a symbol
A Webdings symbol is used for the bullet points with left tab stops in the ruler used to position the bulleted items described in the previous section, "Displaying a two-column bullet list".
To insert a Webdings symbol in Microsoft Word:
Position the cursor for the symbol to be inserted, then select More Symbols on the Insert ribbon to open the Symbols window.
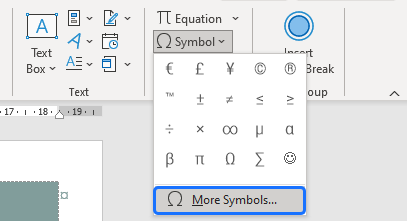
Select Webdings, then select a symbol to insert.
Keeping paragraphs "with next"
In the design stage of a template, it is important to consider how different data scenarios may impact the output.
It would not look good if one of the major headings in this resume appeared at the bottom of a page with the related content at the start of the next page.
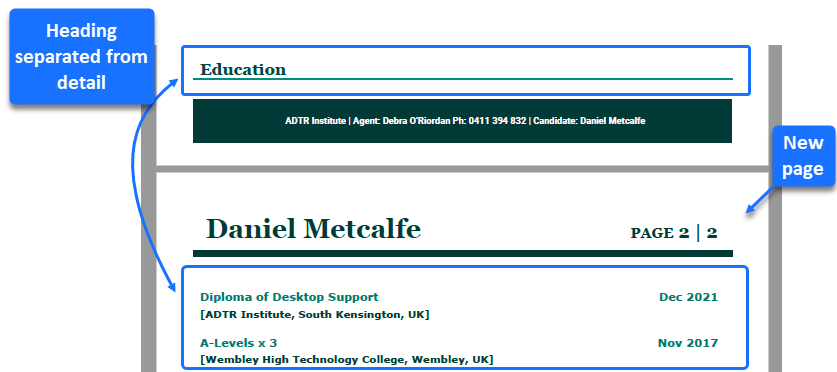
Nor would it be desirable to render the result below where the qualification is separated from where it has been obtained.
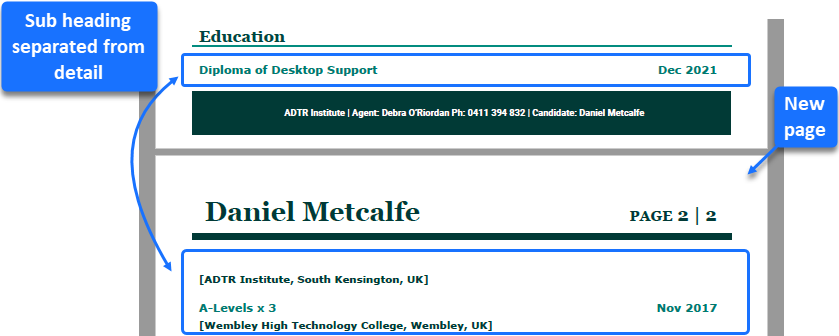
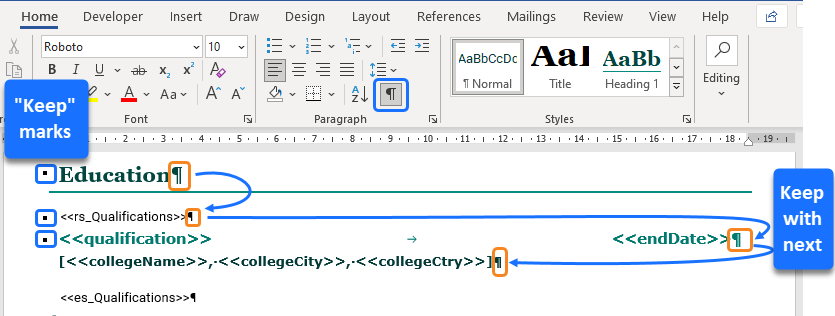
To prevent these sorts of occurrences, Microsoft Word’s Keep with next paragraph option is applied to the different sections.
Keep with next binds the last line of a paragraph to the first line of the next paragraph. This ensures there is no page break between the two paragraphs.
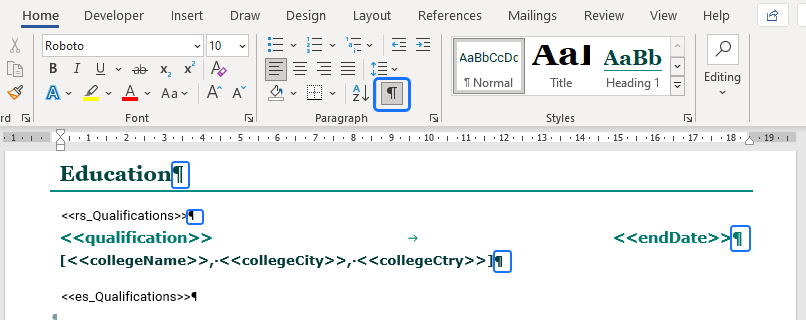
- Select Show/Hide ¶ on the Home ribbon to see the paragraph marker at the end of the heading line, the "qualification" line and the "college" line, as shown below. The markers indicate that each of these is a separate paragraph.
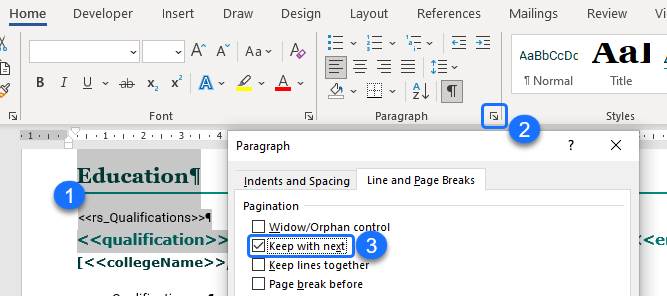
To keep paragraphs together:
- Select the paragraphs to keep with the next paragraph. In Paragraph, select Keep with next then select OK.
Small black square bullets known as "Keep" marks appear in the margin next to the paragraphs where Keep with next is applied.
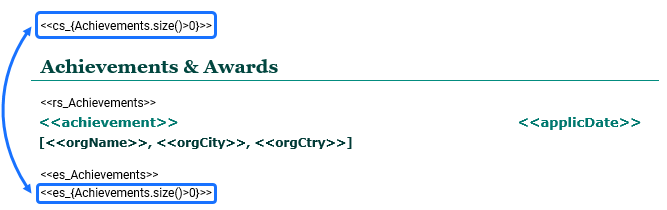
Checking if an array is empty
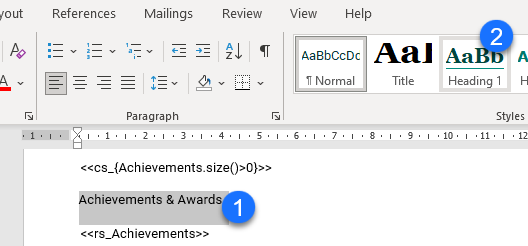
The heading for “Achievements & Awards” should only be displayed if it is relevant to the candidate.
To determine whether the Achievements array is empty or not, the array size() function is used.
If the Achievements.size() function returns 0, there are no elements in the array.
To achieve this, use the <<cs_ conditional section directive with an expression to check if there are elements in the Achievements array: <<cs_{Achievements.size()>0}>>.
The heading only shows if there is at least one element in the Achievements array.
For more information on the size() function, read Array Size.
Headers and footers
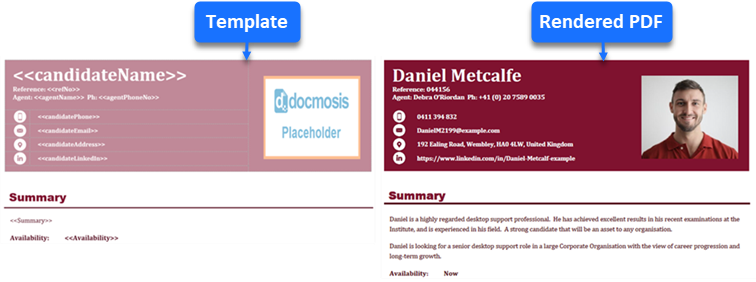
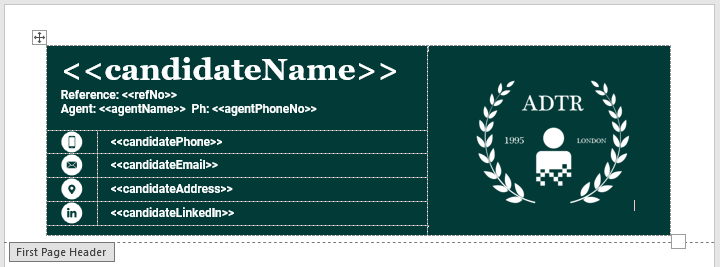
This template uses tables in both the header and footer regions to lay out the relevant information.
The prominent first page header uses bold white text on dark shaded table cells to highlight the key contact details for the candidate.
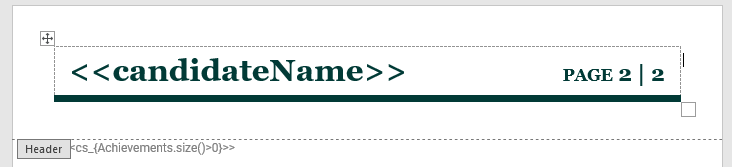
A smaller header that uses a one-cell table, page numbering and a thick bottom table border is set up for subsequent pages.
To achieve a different first page header in Microsoft Word, double-click in a header or footer region of the template to open the Header & Footer ribbon tab, then select Different First Page in the Options group.
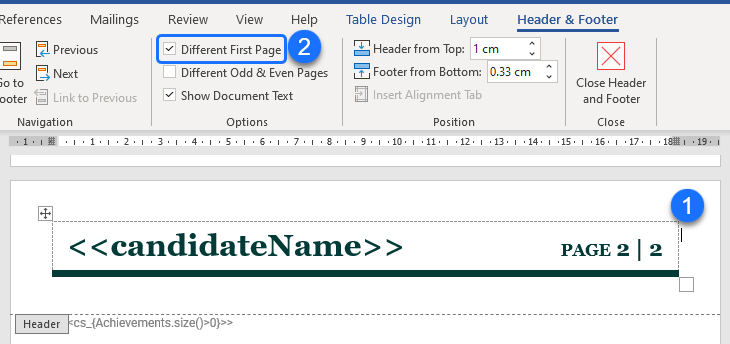
This option assumes that both the header and the footer will be different on the first page.
However, in this example, the same footer is needed for all pages.
To work around this limitation, copy the table in the first page footer region, and paste it into the second page footer region of the template.


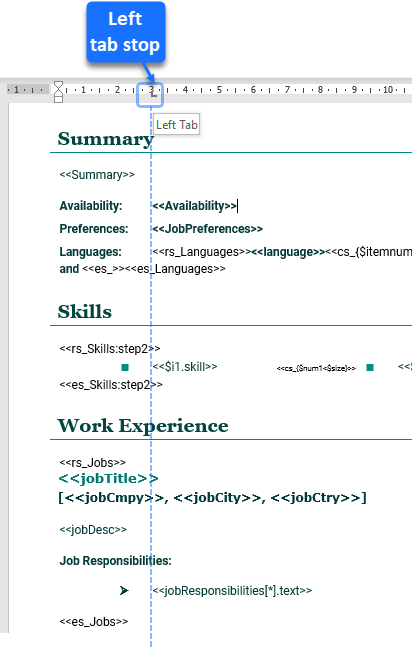
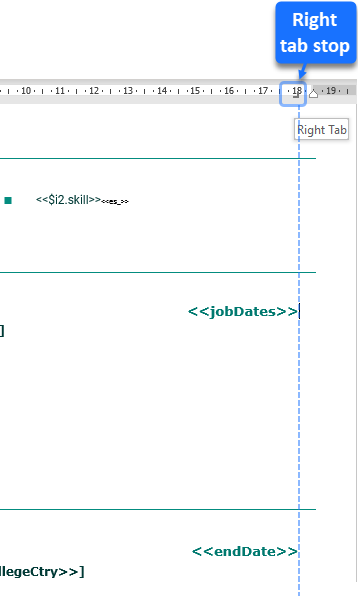
Aligning information using tabs
By using left and right tab stops in the ruler, the different pieces of information are perfectly aligned for a more professional looking resume.
Using styles
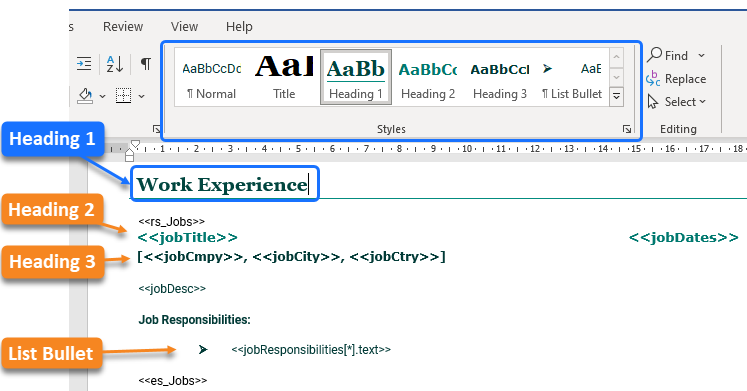
Microsoft Word’s Styles feature is used in this example to achieve consistent formatting of the headings and text.
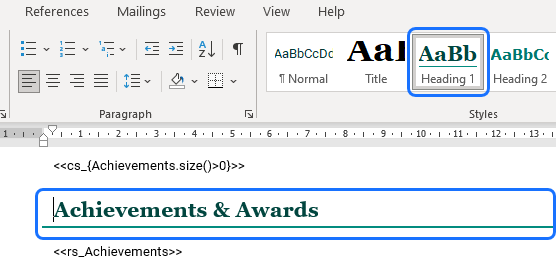
The Style Gallery on the Home ribbon shows the Word styles that have been modified for this template. The selected text's style is highlighted in the Style Gallery, as shown below.
There are essentially two ways to modify the font/formatting of an existing Word style.
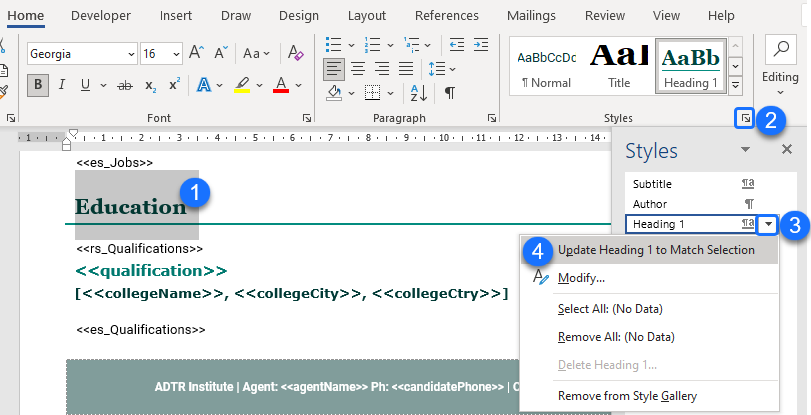
Method one: updating a style to match selection in Word
- Format some text, then select it.
- Open Styles on the Home ribbon, and scroll to find the style to update.
- Open the style's drop-down menu from the arrow next to the style.
- Select Update [Style name] to Match Selection.
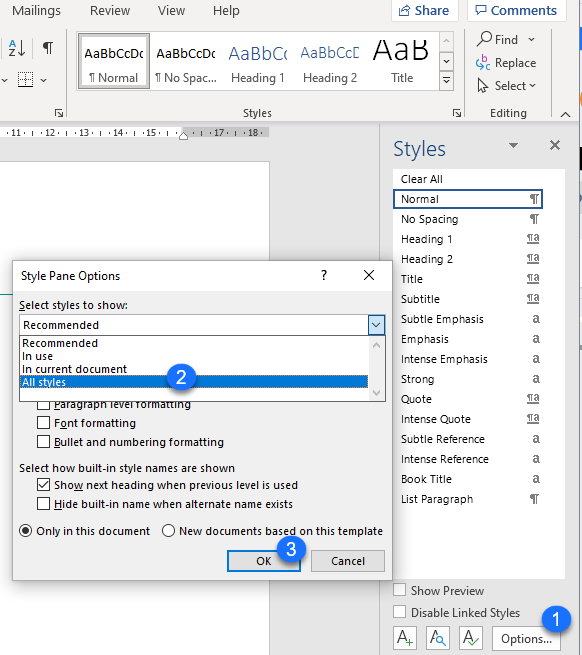
Note: By default, the Styles pane only shows recommended styles, which is the same group shown in the Style Gallery on the ribbon. To change to see all styles, click Options in the Styles pane. In Style Pane Options select All styles, then click OK.
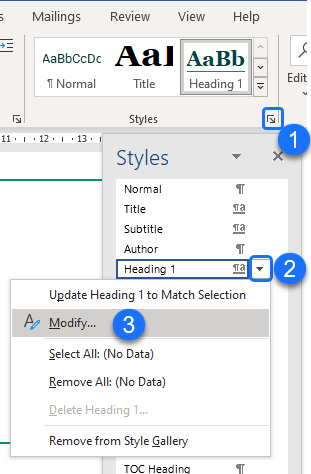
Method two: modifying a style in Word
- Open Styles from the Home ribbon, and scroll to find the style to modify.
- Open the style's drop-down menu from the arrow next to the style.
- Select Modify. This opens the Modify Style dialog box.
In Modify Style, use the formatting options to change the font, font size or font color, for example, then click OK to save.
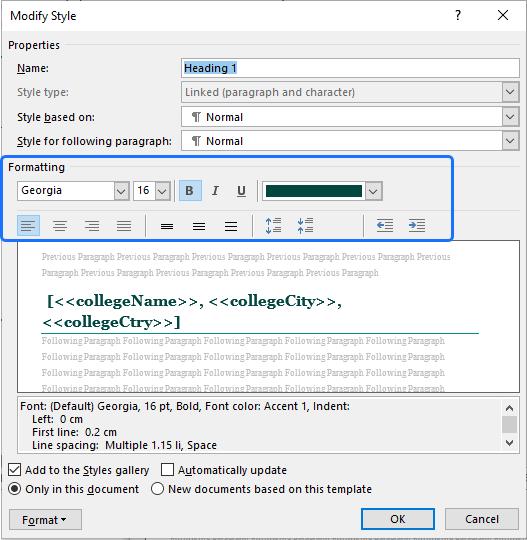
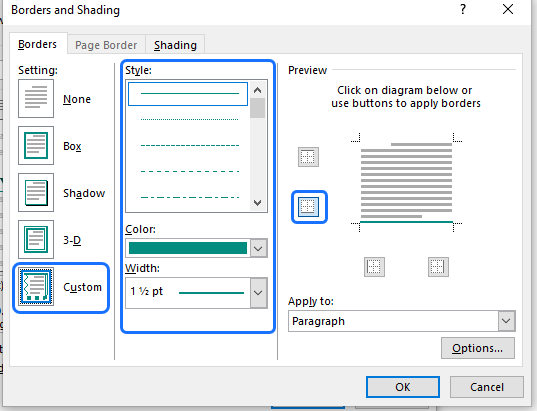
To customize additional formatting associated with a style, such as borders, select an option from the Format drop-down menu. For instance, the "Heading 1" style in the template uses a custom border to underline the main headings.

To add a custom border to the style, select Border from the Format drop-down menu.
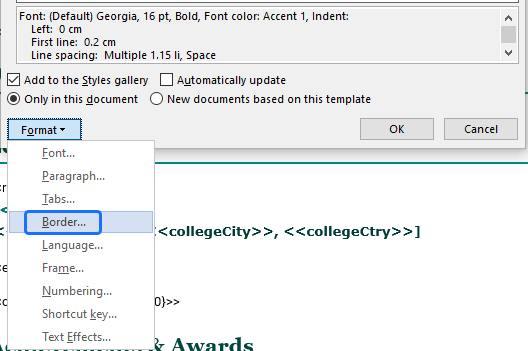
Select Custom border setting, then select the Style, Color, Width, and placement, and click OK to save.
Applying styles
Once the required styles are set up with the desired formatting, it is easy to apply them to the different sections in the template.
To apply a style to text:
Select the text, then click on the required style in the Style Gallery.
The style is applied to the selected text.
It is not essential to use styles for an example like this one. The formatting discussed here can be applied directly to the different headings and text sections. However, the use of styles can make the process more efficient. For example, if you want the major headings to look different, you can modify the "Heading 1" style to change them all at once.
Changing the appearance
With minimal effort, this template can be changed to produce candidate profiles with a fresh new look.
- For a start, use styles to easily change the colors, fonts and formatting used for the text and headings.
- Apply a different color to the shading of the header and footer tables. The new color will still work with the white text, logo and icons with transparent backgrounds.
- Use a dynamic headshot image to replace the static logo in the first page header. For further information on using dynamic images in templates, refer to the articles Images and How to send data or retrieve images from a file or URL.